A]ndroid keyboard apps have their basic style so that there is the numerics, alphabets, and signs all placed differently, and to access these different modes of writing, the keyboard needs to be shifted to that mode. Till the latest keyboard app for Android by Google, named Gboard, all the previous versions of Android keyboards had the above-stated style, and there is no such way in these to set up the entire row of numbers and the alphabet to integrate into a single keyboard only. Because of this, there are many difficulties as typing in passwords becomes tough enough. These most probably include the numbers and alphabets, and both numbers and alphabets are placed in the different keyboard modes. In many other cases, while typing, this splitting of the number keyboard and the alphabetic keyboard in the Android keyboard proves to be a barrier to the speed and fluency of typing. To solve the issue and tell with the users’ demands, Google has put up an option in their latest keyboard Gboard by which the Number row could be added to the usual alphabetic keyboard. If you are also willing to know how the number row could be persistently added to the keyboard or the Gboard on Android, then read the article as we have written about the method for that! Also Read: Best Android Apps For Developers or Programmers
Add Persistent Number Row to the Android’s Gboard Keyboard
The method is quite simple and easy, and you need to follow some of the simple steps we will discuss below; with that, you can easily add persistent number rows to your android keyboard. Also Read: Top 10 Best Android Apps To Train Your Brain
Steps to Add Persistent Number Row to the Android’s Gboard Keyboard
First, make sure that your current keyboard on an Android device is Gboard; go ahead and open up the Gboard settings. The settings could be accessed through the Google Keyboard Shortcut in your app drawer if you have made that before.
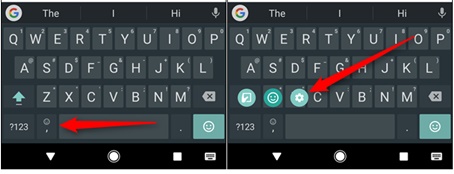
The settings for the Gboard keyboard could also be accessed by opening any app with the text field and then, on the keyboard app, long pressing the button to the left of the spacebar. From there, you need to slide over the cog icon and then select the option “Gboard Keyboard Settings” from the pop-up window.
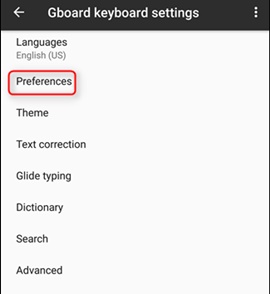
Now, while in the Gboard Settings menu, look forward to the Preferences option and tap on it. Another screen would appear after that, and you would have to follow the further steps on that screen.
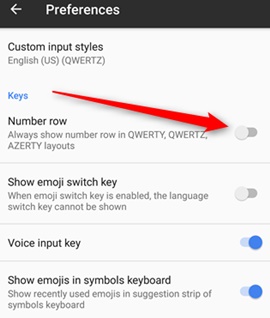
There would be a Keys section and the Layout section on that screen; under the Keys section, there would be the options “Number row”, “Show emoji switch key,” etc. Corresponding to these options, the little toggle keys would be placed to enable or disable that option’s function. You need to toggle the “Number Row” option to enable it.
After you have enabled the Number Row function from the screen, you can return to the home screen or your work as the preferences have been made for the keyboard, and hence from then onwards, the Gboard keyboard will consist of a persistent number row well defined with the usual keyboard! In this article, you have got about how the persistent number row could be added to the Android’s Gboard keyboard, making it easier to type up the text. I hope that you might have also tried this method on your device if you have the latest version of the Android keyboard by Google named Gboard. If you haven’t tried up the method yet, then go and try it now; you will get more eased while typing the numbers and the alphabet after that!
Also Read: Best Android Apps To Transfer Files Over Wifi With High Speed In this article, you have got about how the persistent number row could be added to the Android’s Gboard keyboard, making it easier to type up the text. I hope that you might have also tried this method on your device if you have the latest version of the Android keyboard by Google named Gboard. If you haven’t tried the method yet, go and try it now; you will get more eased while typing the numbers and the alphabet after that!


