Whatever might be the reason, you can quickly gather information about the hard drive without opening the cabinet of your computer. During the replacement, the technical support team would ask you to provide the serial number. Without a serial number, you can’t get your damaged hard disk drive replaced. There are multiple ways to check the hard drive’s serial number on Windows 10, but the CMD one is the easiest one out of all those. You can even use third-party system information tools to grab information about the installed hard drive, but they would require an extra app installation. So, if you are looking for an easy way to find your hard drive’s serial number, you need to use the Command Prompt. Also read: How to Free Up Disk Space After Upgrading to Windows 11
How to Find Hard Drive Serial Numbers in Windows 10 & 11
In this article, we have shared a step-by-step guide on how to find your Hard Drive’s serial number on Windows 10/11 via CMD. So, let’s check out.
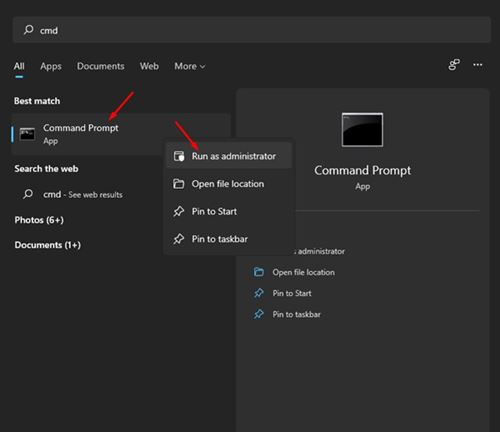
First of all, open Windows search and type in CMD. Now right-click on the Command Prompt, and select Run as administrator.
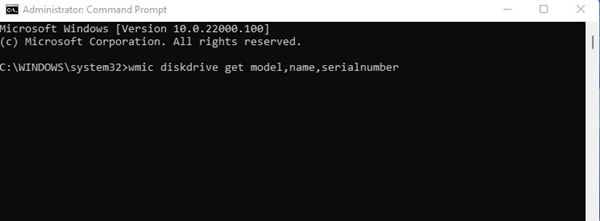
On the Command Prompt Window, you need to enter the following command:
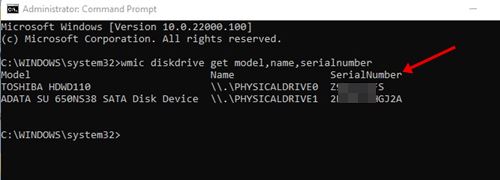
Now, Command Prompt will display a list of all your installed hard drives.
You need to look at the Serial Number column next to your hard drive to find the serial number.
That’s it! You are done. This is how you can find your hard drive’s serial number on Windows 10 and Windows 11 without installing any program. So, this guide is all about how to find your Hard Drive’s serial number on Windows 10 & Windows 11. I hope this article helped you! Please share it with your friends also. If you have any doubts related to this, let us know in the comment box below.


